workflow

Understanding Drone Orthomosaics

Orthomosaics are individual images stitched into one single high-resolution image. In our case, these are taken from the drone and so they are georeferenced and can give a resolution of upto a few cm per pixel. This is drastically finer than freely available satellite data and so drone based orthomosaics are being used extensively for all types of landscape assessment.

Collecting data for an orthomosaic:

To create a drone-based orthomosaic, one has to plan an appropriate flight mission. However, some important factors to keep in mind when planning a mapping mission are -

  • The flight needs to form a grid, with the drone moving at a constant height and gimble pitching straight down at 90 degrees. 

  • Maintain a minimum of 70% to 80% front and side overlap of images captured while planning the flight.

  • Collect Ground Control Points from the Area Of Interest to improve the accuracy of georeferencing of the orthomosaic.

  • Maintain a moderately slow speed for the drone to move between images so as to reduce distortion.

  • Use mechanical or global shutter, if available, to capture images from drone cameras.

More details of this can be found on our blog on creating mapping missions.

Processing drone data to create an orthomosaic:

Once the drone images are collected, they need to be stitched together to create this high-resolution, georeferenced orthomosaic. At TfW, we used WebODM for this purpose. 

WebODM is a user-friendly drone image processing software. It is a web interface of OpenDroneMap (ODM), which is an open source command line toolkit for processing drone images to create maps, point clouds, 3D models and other geospatial products. There are two versions of this software: WebODM and WebODM Lightning. 

The offline version of  WebODM can be installed manually for free using this link. Command line skills are required to install this version. The installer version of offline webODM is also available here for a one time purchase. The offline version uses the local machine for processing and storing data.

Note: The WebODM Lightning option is a cloud hosted version of WebODM with some additional functionalities. This version is subscription based with standard and business categories. The trial version comes with 150 credits of free usage. The free credits suffice to process 337 images. The number of tasks allowed in free trial is not clear from the documentation. Paid plans will be required to process more images.

Once you have the images from the mapping mission - you can import them into the web ODM by selecting the ‘Select Images and GCP’ option. 

Fig. 01: Select images and Edit options

While selecting the images, exclude the outliers. For instance, images of the horizon or randomly clicked images which may be errors and should not be included in the orthomosaic. 

After selecting the images, one can edit the settings of the processing workflow by clicking on the Edit option (Fig 01). The functionalities of all the customizable options available in ‘Edit’ are explained elaborately here.

Some default options are as listed in (Fig 02). The default options work for most cases and the best way to assess edit options is to run them on a test dataset. 

Fig. 02: Customised Edit Options

Pro Tip: The High Resolution option with the original image size option takes more than an hour to process 200 images. The fast orthophoto option is quicker but the orthomosaic will have some distortions as displayed here. The guidelines to optimize flight plans according to the landscape are listed here

Analyzing orthomosaics:

This orthomosaic can now be analysed as a .tif file in GIS softwares. In this section, we explore how to use QGIS for this purpose.

Install a stable QGIS version from Download QGIS. It is advisable to install the most stable updated version than the latest version. 

Import the tif into QGIS: Once you download all the assets from webODM task, navigate to the folder where you have saved the outputs. The users are encouraged to explore the downloaded folders to gain information on the flight plan logistics. Among the downloaded files and folders, you can navigate to the odm_orthophoto folder and import the odm_orthophoto.tif file into QGIS map view.

Fig. 03: Download the assets.

Creating indexed images from satellite and aerial image bands is an effective way to extract information from the images. A list of few insightful indices are listed in this blog. In this instance, we will use the Green Leaf Index to get a visual estimate of the greenness of the area.

To begin, once you have imported the tif file into QGIS, select the ‘Raster Calculator’ from the Raster menu.

Fig. 04: Select raster calculator option.

Select the bands and calculate the Green Leaf Index using the raster calculator:

Green/ (Green + Red + Blue)

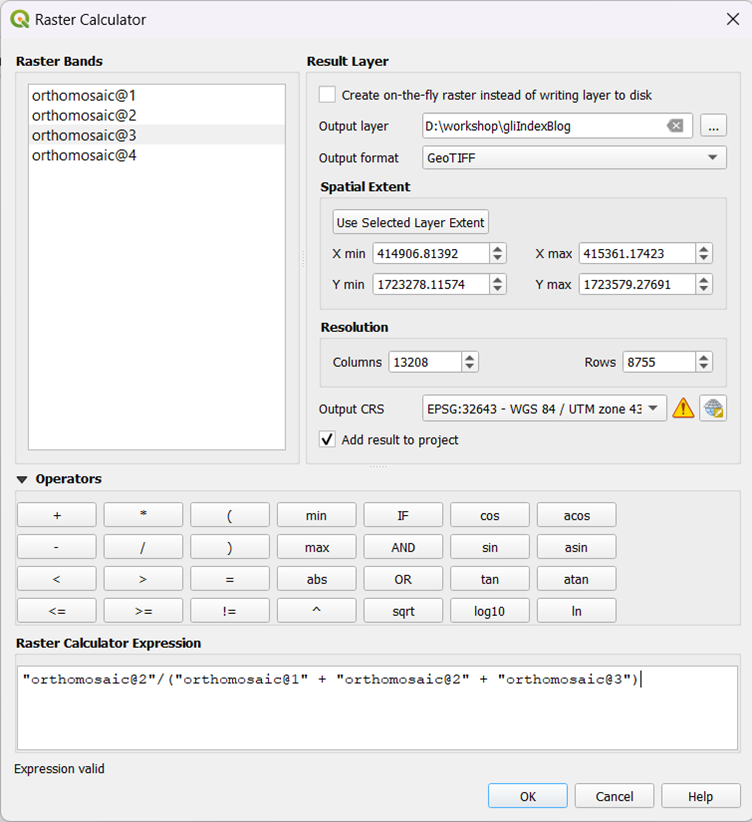
Fig. 05: Raster Calculator. 

Once you have the indexed output, select appropriate symbology to view the indexed image. Right click on the layer and select ‘Properties’ or double click on the image. Navigate to Symbology option. 

Fig. 06: Symbology of layer.

Select the appropriate settings for colour ramp and apply it to the indexed image. 

Fig. 07: Image with selected symbology.

We see that the above image is not giving us a contrast in the image to estimate vegetation health. In this case, one can explore the blending option. This may be useful to get an immediate idea of the area at a glance.

Fig. 08: Blending options for better visual assessment.

In order to extract contrasting information from the orthomosaic and indexed image, we can check the histogram of the indexed image and then decide the minimum and maximum values based on the distribution of the image.

Fig. 09: Histogram analysis for optimising visual output.

Looking at the histogram we can tell that the range of information is encoded between 0.3 to 0.6 pixel value range. Now go back to the symbology and change the minimum and maximum values to that range. 

Fig. 10: Image after rectifying minimum and maximum value range.

From the indexed image, we see that the western part of the image has lower leaf area as compared to the other parts. In order to focus on that area, create a polygon over it and draw a grid.

Fig. 11: Create a polygon layer.

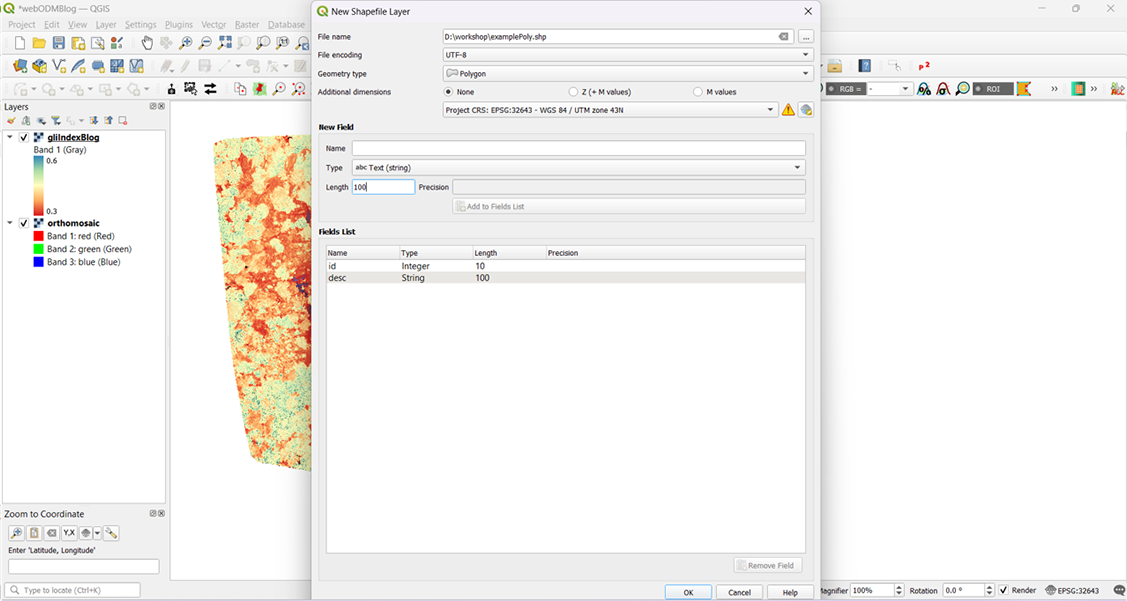
Fig. 12: Select options to create a polygon.

You must digitise a polygon in projected CRS. Projected CRS is necessary for making measurements on the shapefile.

Fig. 13: Digitise and save the polygon.

To calculate the area of the polygon, right click the polygon layer and open the attribute layer.

Fig. 14: Open attribute table.

Open the field calculator and select the option shown in the following image to calculate the area of the polygon.

Fig. 15: Select ‘area’ field from Geometry.

Fig. 16: Area field added to the polygon.

The area field is automatically calculated and added to the attribute table. It is recommended that the polygon layer has a projected CRS for this calculation to be correct. Then save edits and untoggle the editing.

You can also create a grid of squares in the polygon using the create grid tool under the vector menu.

Fig 17: Creating a grid.

You can select the Rectangle type of grid, but there are other options like points, lines etc which can be chosen depending on the objective. Make sure to select the layer extent of the example polygon.

The above parameters should create a grid of rectangles of specified dimension.

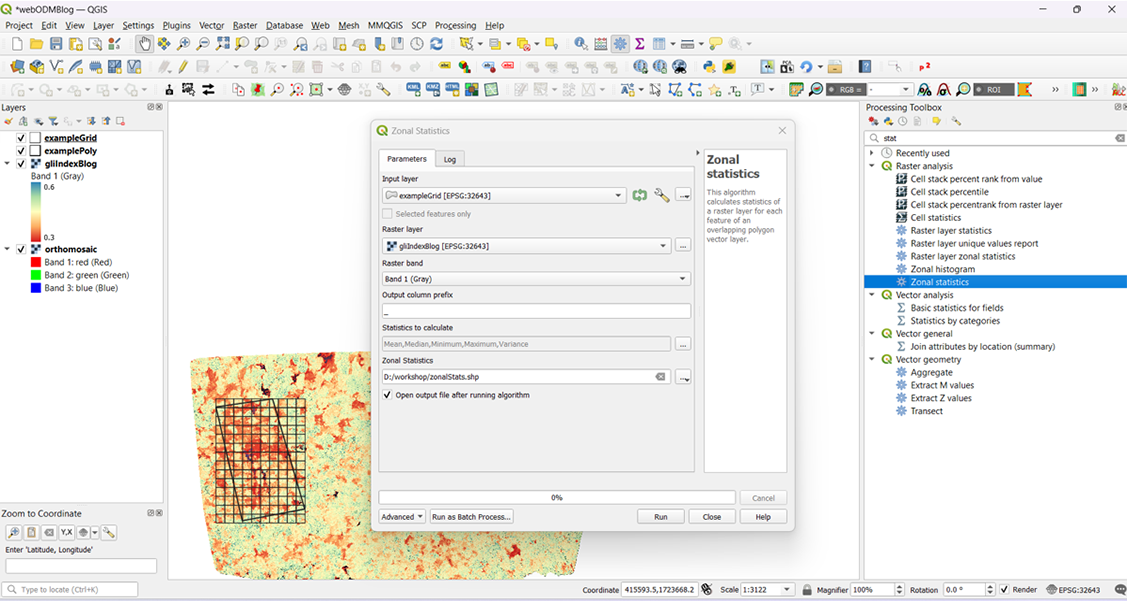
Fig. 18: Zonal statistics from Processing toolbox.

The zonal statistics can be selected from the ‘Processing toolbox’. One can select which statistics are to be calculated and a new polygon of zonal statistics will be created. 

Fig. 19: Select the statistics to be calculated.

Now one can choose the statistic which they want to display and select an appropriate symbology to assess the least to most leaf cover in the selected example area as shown in the figure below.

Fig. 20: Visualise the statistical output.

The Practical Nuances of Calculating Field of View

In this blog, we explore single-image photogrammetry – which is the extraction of information from a single image – including measurements and creation of 3D models. As we delve into this topic, we are learning a lot about the practical nuances of applying these techniques to solve real-world problems. We are currently working on calculating the real-life size of a Ganges river dolphin from the drone footage we acquired from our fieldwork in Bihar earlier this year. This blog continues from our previous post on measuring object size using a nadir image. While that post covered theoretical formulas, here we focus on the practical application of those formulas.

A single frame extracted from drone footage of a Ganges river dolphin surfacing, with zoomed inset of the same.

To get the real-life size of our dolphin, we would need to know the number of pixels the dolphin is made up of in an extracted frame (the image), along with the size of each pixel in some real-life units (eg: metres, centimetres). We would then multiply the number of pixels with the pixel real-life size to get estimates on area covered, breadth, and length. This real-life size that each pixel corresponds to is known as the Ground Sampling Distance or the GSD. The GSD is an extremely useful metric for any georeferenced image since it represents the distance between two consecutive pixel centres measured on the ground, or the distance a side of a pixel represents.

This exploration is driven by the absence of a reference object of a known size in any of our drone footage acquired during our fieldwork from earlier this year. It's challenging to have a reference object consistently in the frame since the drone moves with the dolphin sightings, which are sporadic and spaced out. If there had been a reference object, we could have used the ratio between the object's pixel count and its known size to establish a scale. This scale would then be used to determine the real-life size of a dolphin based on its pixel count.

Theoretically, measuring the GSD of a nadir image is straightforward. One of the formulas we can use to figure out the GSD is as follows, taken from our aforementioned blog:

GSD = A_L/ I_L

where 

A_L is the real-life length of the area being captured in an image, in metres

I_L is the number of pixels that make up the length of that image

To calculate A_L we can use the following formula:

A_L= 2 * H * tan(FOV_L/ 2)

where

H is the altitude of the drone, in metres

FOV_L is the angular field of view along the length axis of the image


I_L and H are parameters that are easy to calculate. While I_L can be figured out by just examining the number of pixels making up the length of the image, H is a parameter captured by the drone itself as metadata. Finding the FOV_L for our drones though – took quite some time!

This parameter, more generally called the field of view (FOV), is used to calculate the GSD of our drone images using the above formula. We tried to figure out the FOV of our drone cameras by exploring forums and official drone manuals, which inevitably led us to some extremely interesting finds—especially regarding the factors and camera settings that might affect a drone's FOV.

So let’s take a look at what exactly is the FOV, how can we find the FOV for a given drone camera, and what all settings would one have to take into account if they are measuring the FOV on their own.

WHAT IS THE FIELD OF VIEW?

The term field of view refers to the viewable area across a specific axis as seen in an image. It is the amount of area that a particular lens system can capture in an image. The larger the FOV, the more area that can be seen and captured by the camera. Inversely, the smaller the FOV, the less is the area that is being seen. Thus, FOV is directly proportional to the extent or amount of area being captured by a camera.

A graphic showing an aerial drone camera's field of view¹- Luo, Y., & Chen, Y. (2021), CC BY 4.0

This term usually refers to either the actual physical area that is captured (in units such as mm) or the angle at which a lens is capturing that area. In this context, we will be using FOV to refer to the angular extent of the captured image. Thus, it should be assumed to be expressed in degrees for the rest of this blogpost.

For any given image, there are multiple types of FOVs. These FOVs are specific to the axis being considered while measuring the area seen by a lens. By axis here, we are referring to an imaginary line that travels across the diagonal, width, or length of an image. Corresponding to these dimensions, there are three distinct FOVs: FOV_D, FOV_W, and FOV_L, respectively. We will be referring to these collectively as FOVs/ FOV unless specified otherwise.

An diagram showing the angles being captured by the three different FOVs for a given image.

To gain a deeper intuition about this term we can carry out a simple exercise. 

Pull out your mobile phone and open your camera to photo mode. Try to keep your phone fixed in a particular position and observe how the edges of the area being captured in your screen change when you do the following:

  1. Change aspect ratio of picture

  2. Change from photo to video mode

  3. Change from HD to 4K or to some other photo/video quality setting

The above are three images taken by a smartphone in the same position but with different aspect ratios: 9:16, 1:1, 3:4  from left to right, respectively. The vertical and horizontal areas being covered change drastically as we shift from one aspect ratio to another. Thus, all the three FOVs change too when we change between these settings.

FACTORS THAT AFFECT A DRONE’S FIELD OF VIEW

One’s first instinct in figuring out the FOV of their drone would be to simply check the official manual for the mentioned specs. Since we use off-the-shelf drones for our work, understanding any limitations was also crucial. As it turns out, the specs in the official DJI manuals aren’t specific or exhaustive. The official DJI manuals don’t really mention how the FOV changes with different camera settings but rather usually mention a single default FOV. This FOV measurement indicates the diagonal FOV and applies only to the native aspect ratio of that drone’s camera while taking pictures with that drone. 

Consider this scenario. Say you need the FOV for when you are recording a video at 60 fps with a 16:9 aspect ratio at resolution 3840 x 2160. The first thought would be to apply the manual mentioned FOV and proceed. But that would be incorrect as based on the settings you are applying, the FOV also tends to change. Chances are that you won’t be able to simply search online for the FOV for your particular combination of settings or even find it for these specific settings in the manual. Rather, you will have to try and figure it out on your own.

The discussion around how to build an experiment to measure the FOV of a drone at some given settings is best left for another day. For now, let’s take a look at some of the factors that change the FOV of the drone’s camera.

Aspect Ratio

The aspect ratio is the ratio of width of the image to its height. It is typically expressed as two numbers separated by a colon, such as 4:3 or 16:9. Camera sensors, devices inside the camera that capture light to create an image, are manufactured in various shapes and sizes, each having a native aspect ratio. The native aspect ratio is determined by the number of pixels along the width and height of the sensor. When shooting in the sensor's native aspect ratio, the entire sensor area is used, maximising the resolution and image quality.

When we shift from one aspect ratio to another, we will usually notice a change in the extent of the area being captured in the frame. This occurs because the camera either crops the image or resizes it to fit the desired aspect ratio. Cropping involves trimming parts of the image, effectively reducing the number of pixels used from the sensor. For instance, changing from a 3:2 to a 1:1 (square) aspect ratio would mean cutting off parts of the image on the sides. Since the extent of area being captured is changing, the FOVs end up changing too.

Consider these two images captured by the same drone camera with different aspect ratios:

Images taken with a DJI quadcopter showing a change in the field of view when aspect ratio is changed from 3:2 (top) to 16:9 (base). Notice how the upper and lower portions of the top image get cropped in the bottom image.

Zoom Level

This is one of the more obvious factors. The more you zoom in when taking an image, the lesser is the physical area you are capturing in the image. The more zoomed out the frame is, the more is the extent of the area being captured by the camera. As the captured area changes, so does the FOV.

A still from this video shows how an increase in the optical zoom level of a DJI Mavic 3 Pro results in smaller captured areas.

Video Mode

If there are additional modes in which you can record your video, then FOVs for different modes might vary significantly. Even when the resolution and aspect ratio remain the same, a change in the recording mode can alter the FOVs. Take the DJI Mavic 2 Pro as an example. There are two different modes for recording a 4K video: Full FOV mode and the HQ mode. Videos recorded using these modes have the same resolution, 3840 x 2160. However, both of these have different FOVs! 

In the Full FOV mode, the full camera sensor is used, more or less, followed by a downsampling of the video to a 4K resolution. In the HQ mode, however, a cropped portion of the sensor is used to capture video in 4K resolution² directly. This leads to different portions of the camera sensors being used and therefore, different amounts of areas being captured. Thus, their FOVs are different too.

This image taken from this video clearly illustrates the difference between Full FOV mode and HQ mode on the DJI Mavic 2 Pro. Both modes have the same resolution and aspect ratio., but they capture different areas.

Frames per second

Commonly written as fps, it is the measurement of how many individual image frames appear in one second of video. The higher the fps, the more frames there are in a video, and the smoother that video appears.

This was surprising to be honest. One wouldn’t expect the FOV to change with a change in fps. While fps is simply the number of frames recorded in a video, FOV is a completely different concept that just governs the amount of area a camera captures. They are theoretically supposed to be independent of each other. However, for some drones, changing the fps at which you are recording a video changes the FOV.

Take the AIR2S ³ ⁴ for example. Changing the fps while recording a video will change FOVs of the resultant video. The higher the fps the more frames the drone is recording and processing. If recording a high quality video at 4K resolution, then the drone might lack computational power to process all the frames at the same time. As a fix, the drone crops the video to reduce the data/information that the drone is processing. Because the video is cropped, the FOV is also reduced.

The top image shows an image taken by DJI Air2S at 24 fps while the one at the base is at 60 fps by the same drone with the exact same other settings. Notice how the area captured and field of view reduce in the bottom image.

In conclusion, there are many practical nuances that one might overlook when focusing on the theoretical aspects of a problem. Listed in this blogpost are just some of the factors that affect the FOV when working with drones. Building equations to model how all the above factors influence FOVs could be a fascinating challenge. Creating a parametric equation would be a valuable tool for effective estimation of FOVs, but it would require significant effort to collect data across all the setting combinations via multiple field experiments for a number of different drones. Moreover, there would be a minor problem where for every combination of camera settings that one employs- one would need to understand how that setting exactly affects the FOV, which might not be a trivial exercise. Therefore, instead of taking that route, we are only trying to measure the FOVs for the settings which we commonly employ during field work. We have worked on some interesting field work and experiments for this – and look forward to discussing this soon!

REFERENCES

1- Energy-Aware Dynamic 3D placement of Multi-Drone Sensing fleet. Sensors, 21(8), 2622. https://doi.org/10.3390/s21082622 , Luo, Y., & Chen, Y. (2021)

2- DJI Mavic 2 Pro 4K HQ vs Full FOV EXPLAINED + TESTS 

3- DJI Air 2S video crop at high fps? 

4-  Air 2S FOV - 4K 30FPS VS. 4K 60FPS  

And some Helpful Links

Calculating Object Sizes in Drone Images

The author, along with a colleague, is experimenting with drone calibration. Picture by Nancy Alice/ TfW.

Currently, my focus lies in solving the intriguing problem of calculating the size of objects in drone-captured images – a recurring maths problem in our conservation work. In this case it was to be able to estimate the size of a Ganges river dolphin as captured in videos using small quadcopters. Setting this workflow is foundational as solving this problem could help us and other conservationists in a number of areas including, but not limited to, estimating the demographic distribution of animal species, calculating garbage hotspot sizes, sizing up the footprint of an image, tracking an individual animal’s body condition over time, and more.

As it turns out, this problem has already been solved, at least under certain assumptions. There are a couple of ways to calculate the size of an arbitrary object, some of which are elaborated upon in this blogpost.

A First Step

Images are made up of pixels and usually, pixels are small squares. We are going to assume that we have square pixels. Each element or distinct object one can see in an image is made up of pixels. Since we want to measure the real-life size of an object in an image, one way of doing that is to use the number of pixels occupied by that object. If we know how many pixels it occupies along with how many real-life centimetres/metres each pixel corresponds to, then we can calculate:

Area of an Object = Number of Pixels in the Object * Area Occupied by a Pixel in Square Centimetres

⇒ Area of an Object = Number of Pixels in the Object * GSD²


Where GSD (Ground Sampling Distance) is the distance between two consecutive pixel centres measured on the ground or the distance a side of a pixel represents. Here, it is the centimetres the side of a pixel denotes.

This also works under the assumption that all pixels are of the same size, and additionally denote the same real-life centimetres. Our formula won’t work if different pixels capture different amounts of distances on the ground, say, if one pixel captures 1 cm while another captures 10 cm of the ground.

Thus, our immediate problem becomes to find the GSD. Counting the pixels making up an object can be done rather trivially.

Diagram showing how to calculate the area occupied by an object of interest in an image.

The following is the description of the problem statement. 

There is an image, I, which has been taken from a drone, UAV, flying at a height, H. The dimensions of this image are I_W, I_L, and, I_D, corresponding respectively to the width, length, diagonal dimension of the image as measured in pixels. Additionally, the actual real-life area being captured has the following corresponding dimensions: A_W, A_L, and, A_D, measured in metres (m).

The dimensions (in pixels) of an image I, as captured by our drone’s camera.

The real-life area captured by our drone’s camera. Different dimensions of the area have been marked.

A nadir image is one which is taken with the drone camera pointing straight down at the ground. This image has been taken in a nadir position.

Diagram of our drone capturing a nadir image of the ground at a known height or altitude.

Additionally, the drone has a camera which has a focal length, F, and a sensor to capture the image with dimensions, S_W, S_L, and S_D, corresponding respectively to the width, length, diagonal dimension of the sensor as measured in millimetres (mm). All of these are the real sizes and not 35mm equivalent dimensions.

The dimensions of the camera sensor have been illustrated here.

The next parameter is the field of view or FOV. This is expressed in degrees. Sometimes, people call it angle of view instead. This again is different for the width, length, and diagonal of the image as there are different amounts of areas being captured corresponding to each of these dimensions. So, we have three views with us: FOV_W, FOV_L, and FOV_D.

Diagram of the field of views corresponding to the length and width of the area being captured in our image. The point where the field of view angle forms from is the lens of the camera.

The final parameter is the one we are interested in finding out, GSD. As defined earlier, this is the real-life, actual distance each pixel side represents. Thus, the distance per pixel side. If we have the distance, in centimetres/metres, covered by the width or length of the image and then divide it by the number of pixels covered by that dimension in the image, then could divide the distance by the pixels to get the GSD. Thus, we have:

GSD (m)= A_W/ I_W = A_L/ I _L

Where (m) indicates that the GSD is measured in metres.

Now, let’s jump into actually solving this problem.

Our First Approach

This consists of an easy approach to estimate the areas covered by the image by using some basic trigonometry. Refer to our short yet detailed tutorial on solving this exact problem in one of our previous posts back in 2019, for details and derivations for the formula used:

Diagram showing the relationship between our drone’s sensor, the camera lens, and the area being photographed/ captured.

A_D= 2 * H * tan(FOV_D/ 2)

A_W= 2 * H * tan(FOV_W/ 2)

A_L= 2 * H * tan(FOV_L/ 2)

Alternatively, we can also find A_W and A_L using the aspect ratio, r = I_W/ I_L and the fact that that A_W, A_L, and A_D form a right triangle, as follows:

A_L = A_D/ √(1 + r²)

A_W = r * A_D/ √(1 + r²)

Now, for calculating the GSD, we have:

GSD (m) = A_W/ I_W = A_L/ I_L

Tada! We are done with the first approach. If following this was tough, this video explains this approach very well as well.

Our Second Approach

Another common way to solve this problem is to use similarity to derive the more commonly used formula for calculating GSD.

Diagram of the triangles formed when using a drone to capture a Nadir image of the ground. Applying concepts from ‘Similarity’ allows us to derive a formula for the GSD.

If we take a look at how our camera sensor captures an image of the ground, we can see that there are two triangles that are formed, △AOB and △COD. Both of these triangles have a common angle i.e FOV = ∠AOB = ∠COD. The FOV being used here depends on the dimension of the sensor we are looking at. If AB is the diagonal of the sensor, S_D , then FOV_D = ∠AOB = ∠COD. In that case, A_D = CD. Similarly, if AB is S_W, then A_W = CD.

Since AB || CD, we see that ∠OAB = ∠ODC and ∠OBA = ∠OCD since they are alternate interior angles.

Since three corresponding angle pairs are equal in both the triangles, we have similarity by AAA criterion, △AOB ~COD. As a consequence of similarity we know that the ratio of the areas of similar triangles is equal to the square of the ratio of their respective sides.

AB²/ CD² = (1/2 * AB * F)/ (1/2 * CD * H)

⇒ AB/ CD = F/ H

⇒ CD = AB * H/ F 

Because AB and CD can represent either the diagonal, width, or the length dimensions,

A_D = S_D * H/ F

A_W = S_W * H/ F

A_L = S_L * H/ F

Finally, since we know that

GSD (m) = A_W/ I_W = A_L/ I_L

We get,

A_W = GSD * I_W = S_W * H/ F

⇒ GSD (m) = S_W * H/ (I_W * F)

Similarly,

GSD (m)= S_H * H/ (I_H * F)

Tada! We have done it once again. We have solved the crisis of the missing GSD! And that’s a wrap! 

In conclusion, choosing the appropriate formula from the above depends on which parameters you can access and trust. As an example, you might have found the focal length of your camera for a given setting through the EXIF data, but then maybe you don’t trust the data being reported. On the other hand, you might know the default field of view of your camera from its official documents but then, you find out that the field of view keeps changing from one mode of the drone to the other, for different aspect ratios, zoom levels, etc. (it is quite a mess). 

Going through all these formulae and deriving them was a fun and educational experience. It gives us a clearer understanding of the caveats of using drone parameters in scientific research. We are now using these to estimate the size of river dolphins in the Ganges and better understand their age, body structure and health.

We hope you find this useful for your work- have fun and tread carefully. If you have any comments, or use some completely different way to solve this problem, we would love to hear from you- write to us at <contact@techforwildlife.com>

Cheers!