2024 at TfW

This year has marked an extraordinary chapter of learning and growth at Technology for Wildlife Foundation. Through the years, we've been honoured to collaborate with passionate individuals and organisations fiercely committed to environmental and wildlife conservation. Our deepest gratitude goes out to everyone who has walked this path with us at TfW. As we prepare to close our doors, we take a moment to reflect on the milestones of this year, in our final annual summary.

Exploring mangroves during an early morning excursion with Tanmayi Gidh from Rainmatter Foundation.

We began the year with a field excursion to a mangrove patch in Goa, accompanied by Tanmayi Gidh of Rainmatter Foundation. During this visit, we looked at the ecosystem, talked about its significance as well as had an in depth discussion of our work. Tanmayi's article, published in the first quarter of the year, captures our conversation and can be found here.

Poster for announcing the exhibit on the social media, read more here.

Our exhibit, (Understanding) Mangrove Carbon, was selected as part of Science Gallery Bangalore’s Carbon exhibition last year, and it opened to the public mid-January. This exhibit highlights our work on remote sensing methods to estimate carbon sequestration by mangrove ecosystems, combining research conducted over by TfW over the years using drone and satellite data. We collaborated with visual artists who brought our scientific findings to life through multimedia interpretations. We are deeply grateful to our collaborators - Himanshi Parmar, Svabhu Kolhi and Gayatri Kodikal, for their continued support throughout the year of preparation. The digital material from the exhibit is also available on our website.

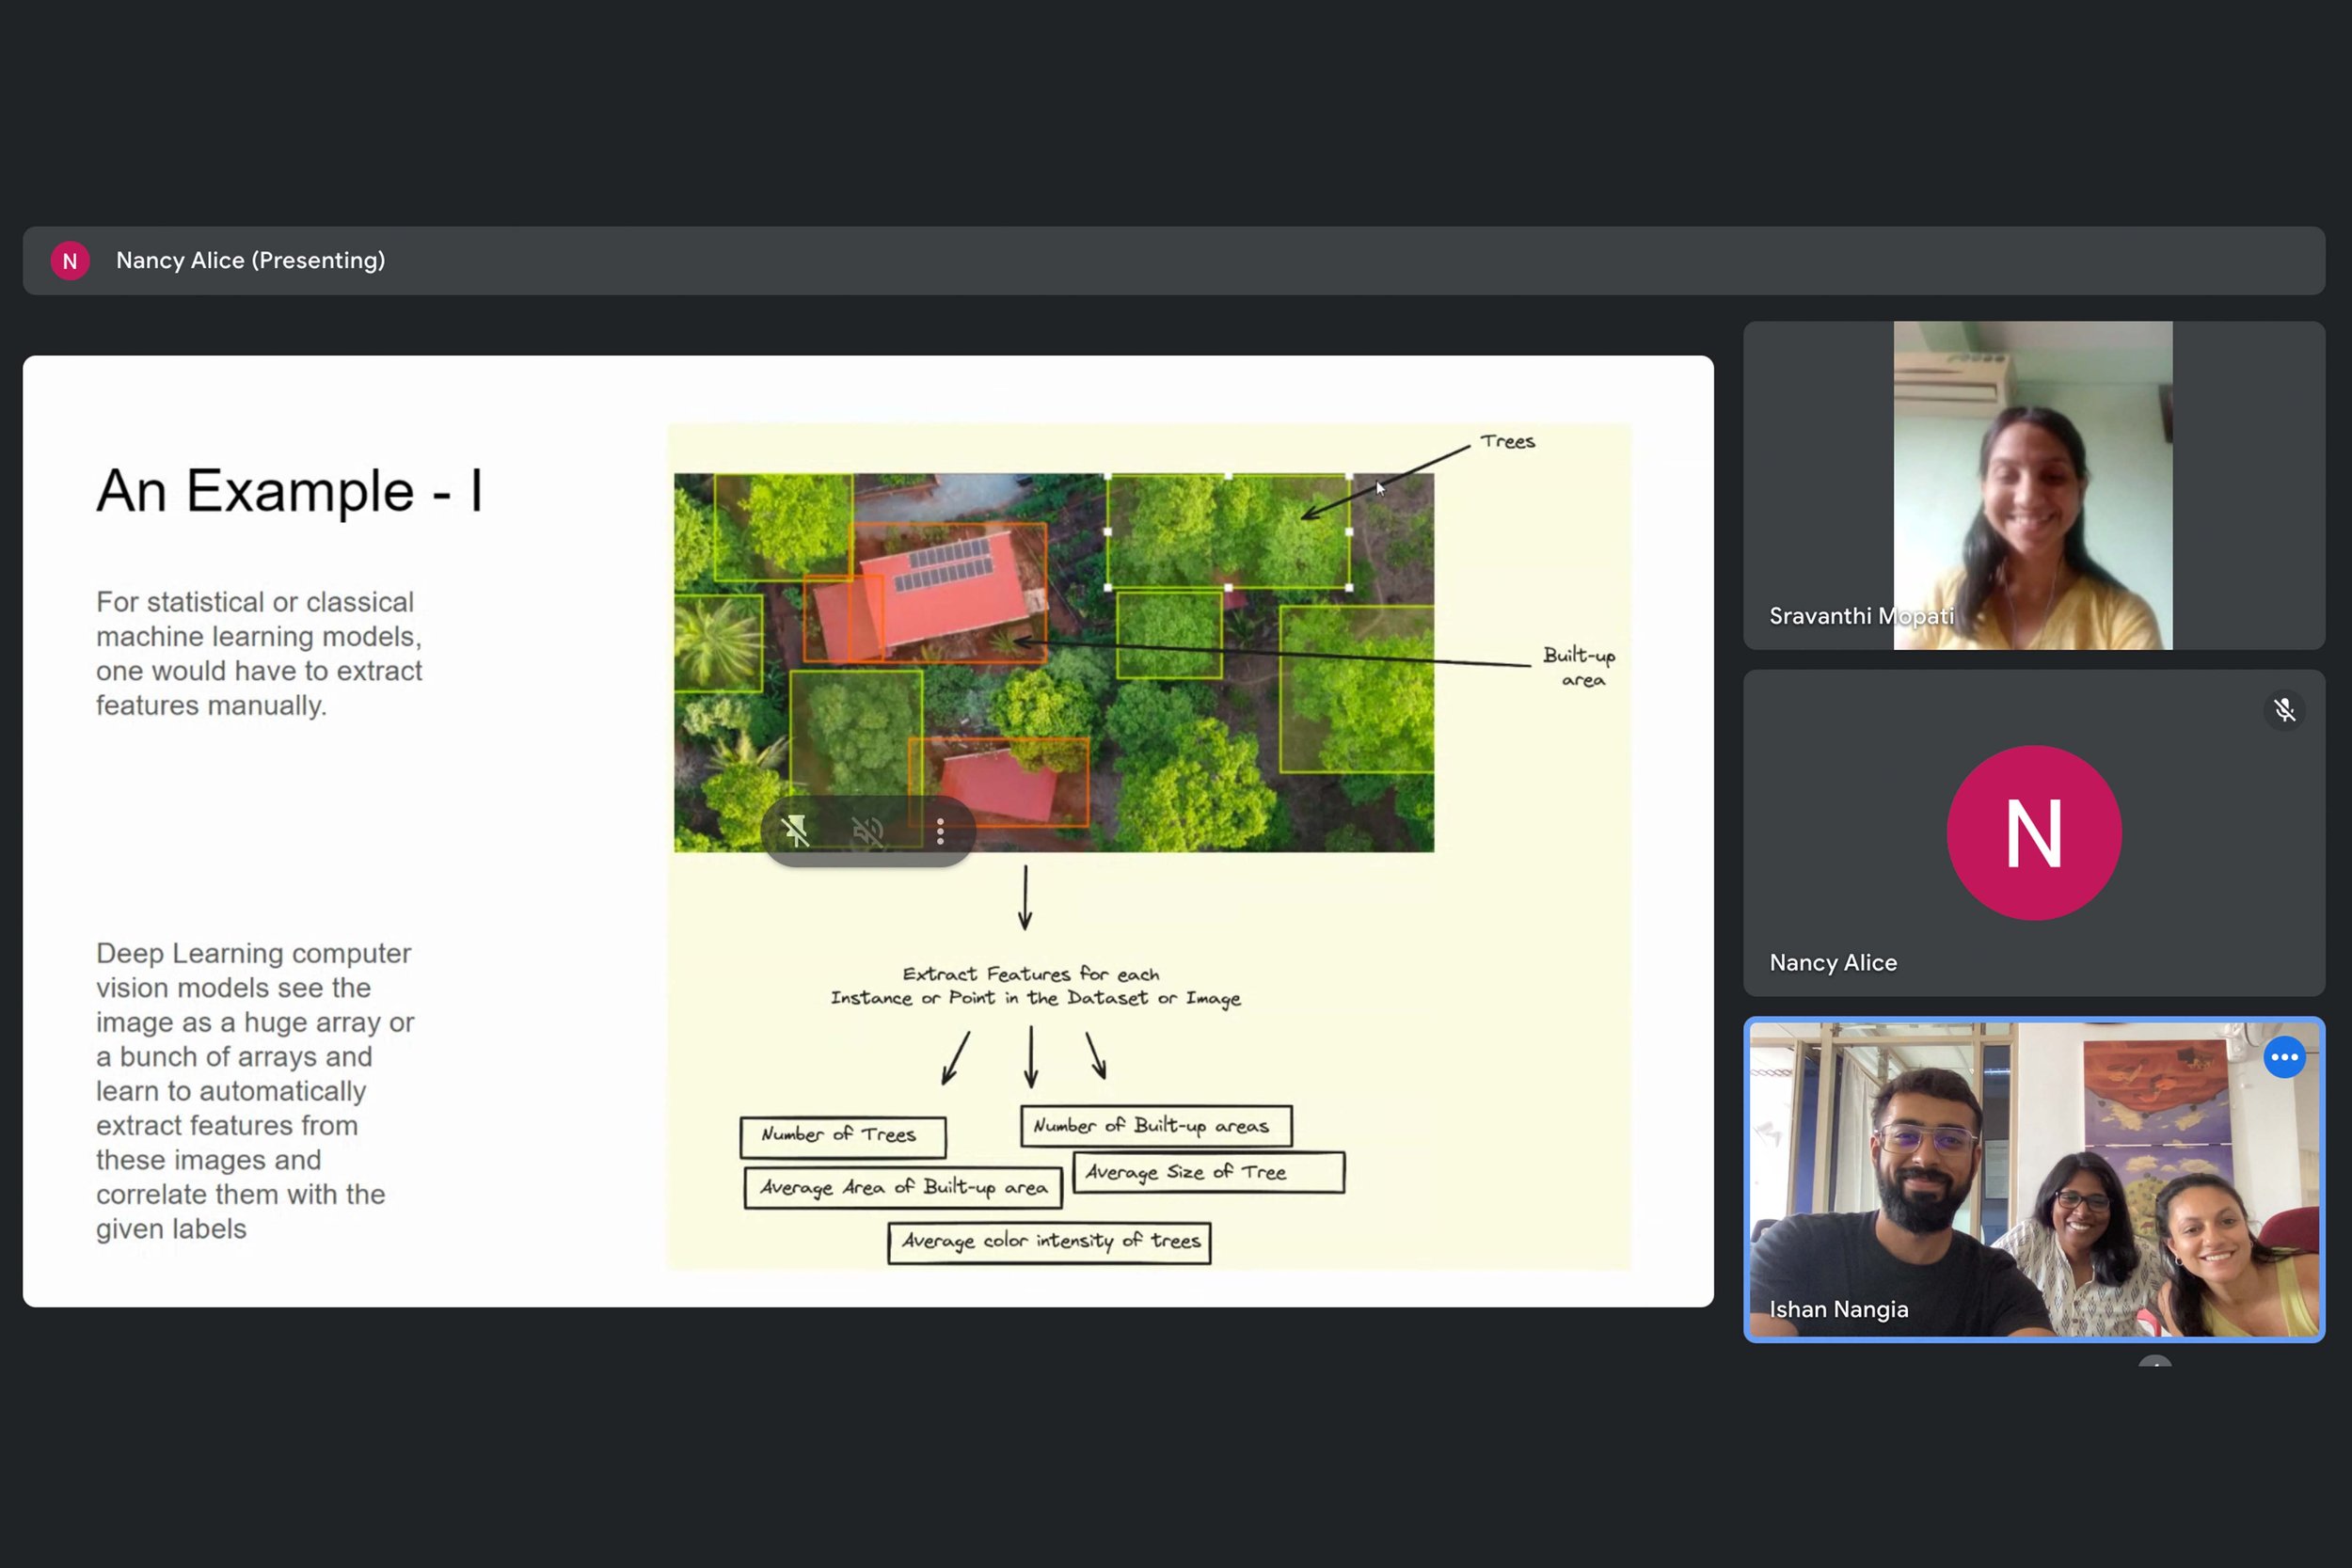
Screengrab from Part-I of an internal workshop on series on the different aspects of working with images.

In February, we held an internal workshop series on the different aspects of working with images within our organisation, including drone, satellite and hand-held camera imagery. Since we use all three types, the workshops provided an opportunity to discuss how each of us approaches and analyses these images, and to establish a shared vocabulary for smoother collaboration. Part-I of the series, led by our Data Analyst, Ishan Nangia, covered the use of computer vision, particularly in drone imagery.

Group picture from the day-long working meeting with team members and collaborators on the Restoration in the Western Ghats project, February 2024.

Later in the week, we held a day-long working meeting with team members and collaborators to explore how technology can support ecological restoration in the Western Ghats. Our field partners, Alex Carpenter, Cristina Toledo, and Aishwarya Krishnan, joined us, along with Dr. Madhura Niphadkar and Dr. Kartik Teegalapalli, who served as experts in labelling degradation factors in our drone imagery. Arjun Singh from ERA India also participated in the discussion. Learn more about this project here.

Nandini Mehrotra in the field with students from ATREE in Bagepalli, Karnataka.

In mid-February, we compiled our comprehensive workflow for using drones in conservation mapping and data collection. This was immediately implemented in a workshop initiated by Dr. Rajkamal Goswami for students of ATREE at their field station in Bagepalli, Karnataka. Conducted by TfW team members: Sravanthi Mopati, Nandini Mehrotra, and Nancy Alice, the workshop provided a technical overview of integrating UAVs and their data into the toolkit for landscape restoration. The sessions covered drone fundamentals, applications in conservation, flight planning, and post-processing of data. Participants also engaged in hands-on training with various software tools and participated in a field demonstration.

The TfW team with the '(Understanding) Mangrove Carbon' exhibit in the background.

After the workshop, our team returned to Bangalore, where we had the opportunity to view the (Understanding) Mangrove Carbon exhibit in person at Science Gallery Bangalore.

Project teams from WCT and TfW in action, Bihar.

Towards the end of the month, we travelled to Bihar with the Wildlife Conservation Trust (WCT) to study behaviour of Ganges river dolphins. This also marked our third season of collaborating with WCT to study these river dolphins. Using small quadcopters, we captured videos of dolphins in pre-identified hotspots, gathering valuable information that was previously difficult to obtain. The data is now being analysed to estimate the size, body condition, and age brackets of dolphins in this region, with plans to publish the findings in a paper later this year.

Group picture from our field trip to Mhadei, March 2023.

In March, following up on our day-long workshop in early February, we visited our site partners Alex Carpenter and Cristina Toledo, in Mhadei with conservationists Benhail Antao and Arjun Singh joining us on this field trip. Since 2022, TfW has been collaborating with the Goa Botanical Sanctuary to explore the use of technology for ecological restoration on their 150 hectares in the Goan Western Ghats. Our work focuses on developing open-source methods that integrate ground, UAV, and satellite data to assess land degradation and guide restoration efforts. We hope that the methods we are developing, which will soon be published, will benefit others working on similar projects in the Western Ghats.

Screengrab from Part-II of an internal workshop on series on the different aspects of working with images.

As our field season slowed, we were able to focus on other projects, including our report on using drones for conservation in India. Towards the end of the month, we conducted Part-II of our internal session on image analysis, led by Nancy Alice. This session explored the different ways team members interpret images, reflecting on our earlier team discussion about varying perspectives on image analysis.

The TfW core-team and its Directors in Goa, April 2024.

In April, the TfW core-team and its Directors gathered for a heartfelt discussion about the difficult decision to close the organisation. These conversations marked the beginning of a careful process to complete our existing projects and slowly wind down operations.

Team members conducting drone calibration experiments in to get accurate error margins.

While off-the-shelf drones are useful, we still need to adapt them for specific tasks. During our analysis of field data from Bihar, we discovered that certain values, like height and camera angles, required calibration. Led by Ishan Nangia, our team worked in April and May to refine error margins in the drone's measurements, experimenting with simple materials and available spaces. These findings are now featured in a blog post on calculating real-world object sizes from drone images. For a detailed breakdown of the process and results, read Ishan’s blog post here.

We also conducted online workshops with Earthfocus on methodologies for the use of drones to plan and monitor a restoration project, during these two months.

Playtesting the Elephant Board-game amongst friends in Goa.

Over the past few years, we have been developing a board game focused on elephant corridors and human-wildlife interaction. We have play-tested and subsequently refined the game in various settings, including work environments, home, and structured forums. In May, we conducted a playtest with a control group in Goa, which included wildlife biologist Dr. Nandini Velho. The feedback from this session has also been documented for incorporation.

Aerial view of olive ridley turtles recorded during the joint field survey in March 2023.

Later in May we also published a case study of our work on tracking near-shore olive ridley turtles using UAVs in collaboration with WeRobotics, a global network of practitioners using drones for public good.

Over the years, we’ve explored and learned how to use appropriate softwares to create an efficient workflow with off-the-shelf quadcopter drones for conservation and scientific research. In June, our team focused on documenting this process in simple ‘how-to-?’ blogs so other conservationists can benefit from it and continue to do impactful work with it. This section on our website can be accessed here.

Illustrated by Svabhu Kohli, the artwork depicts TfW’s technology-driven conservation efforts across various ecosystems.

At the end of the month, we publicly announced the closure of the organisation, alongside the release of Svabhu Kohli's illustration showcasing TfW’s technology-driven conservation efforts across various ecosystems.

Screengrab of Ishan's last team-call with TfW.

We also bid farewell to Ishan Nangia, who is moving on to his new role, while working on his independent initiative, ReefBuilder. At TfW, he used computer vision and mathematics to extract conservation-relevant data from drone footage.

Additionally, Nandini Mehrotra appeared on the Heart of Conservation podcast with Lalitha Krishnan, discussing the legacy of ethical and collaborative processes with technology at TfW for impactful grassroots action.

We published our fourth Grove update in early July, covering the period from mid-April to December 2023.

TfW team picture from the final retreat in July 2024.

In mid-July, the TfW team held our final retreat in Mollem, which included a night walk in the forest and we were able to observe bioluminescent fungi. This retreat provided an opportunity for the team to reflect on our conservation journey and share closing thoughts.

We also hosted a heartfelt farewell for our team members and collaborators to share stories and experiences from our time together at TfW. It was a warm occasion where we reflected on our achievements, discussed the impact of our work, and conducted interviews to capture our journey. The evening was marked by gratitude and nostalgia: a celebration of meaningful connections and dedication that defined our efforts at TfW.

Over the past few years, we’ve been dedicated to creating a report that documents the use of UAVs for conservation in India. We owe a special thanks to Shivali Pai, whose MPhil research at Liverpool John Moores University laid the foundation for this important work. Toward the end of 2022, Shivangini Tandon joined us, conducting additional interviews in a semi-structured format, adding valuable insights to the project.

Wings for Wildlife team-members (L-R) Nandini Mehrotra, Nancy Alice and Shivangini Tandon.

In July, we were proud to publish ‘Wings for Wildlife’  highlighting how drone technology is being applied to wildlife and environmental conservation in India. Through 15 case studies, the report showcases drones' potential in biodiversity conservation, animal behaviour studies, and habitat mapping, while also addressing their limitations. The report is available for free download on our website. We also began printing the final copies of the book and celebrated this milestone in-person with team members Nandini Mehrotra, Nancy Alice and Shivangini Tandon (above L-R).

With this, our ongoing projects concluded, and we began documenting and archiving our work. Throughout July and August, the TfW website saw major updates, including new information and blogs. The website will continue to serve as an archival resource after the organisation's closure.

In-person workshop with consultants reflecting on our conservation efforts in Goa, July 2024.

As part of this effort, we held an in-person workshop with consultants from Imago as well as with Sanket Bhale of WWF-India to document our work. Additionally, we began impact assessment meetings to reflect on our collective learnings. These meetings are helping us evaluate our initiatives, celebrate successes, address challenges, and ensure that our experiences make a meaningful contribution to the wider conservation field. The study is ongoing, and we look forward to sharing it publicly soon.

TfW team (L-R): Sravanthi Mopati, Nandini Mehrotra, Ishan Nangia, and Nancy Alice, July 2024. Picture courtesy of Svabhu Kohli and Farai Divan Patel.

As we wrap up our operations, we are proud of the legacy we've created together and the lasting impact of our efforts. The resources, reports, and insights we've developed will remain accessible on our website, continuing to support and inspire conservationists and enthusiasts alike.
Demystifying DashWare

Towards the end of our field season in 2022, my colleague and I began searching for an application to add annotations to our extensive video footage. After exploring various options, we concluded that DashWare, an open-source software, was the best tool* for our needs. This blog aims to explain how to use DashWare and share my insights on its application in our conservation work.

View of a drone controller while on a mission.

Our work extensively relies on the use of off-the-shelf drones for field operations. In addition to capturing photos and videos, drones collect vital data such as distance from launch, geographical coordinates, flight time, battery status, and more. This information is indispensable for research and gaining a better understanding of wildlife and ecosystems.

However, once we retrieve the video footage from the devices, this valuable flight data is missing visually in the video playback. Not all drones generate subtitle files, and even when they do, these subtitles are often presented as plain text in the media player. Unfortunately, this text-based representation does not effectively convey the data we collect during these flights alongside the aerial footage. This led us to search for an application that could help us annotate our aerial footage. We had specific criteria in mind: the tool had to be open-source, user-friendly, and require minimal setup and learning.

Using open-source software like Dashware can also be a valuable tool for conservationists who use drones to monitor wildlife and their natural habitats. It allows the addition of telemetry data to drone videos, providing context on flight path and animal behaviour, complementing traditional field practices. Dashware helps synchronise the telemetry data with the video footage, allowing users to display the data in real-time as the video plays. In addition to displaying data such as speed, altitude, and GPS coordinates, it offers customization options like font, colour, position of text, and data points selection.

(A) GETTING STARTED: 

  1. Installing DashWare

    The open-source application can be accessed for free at the Dashware website: http://www.dashware.net/dashware-download/  or elsewhere from the web.

  2. Video Processing

    There is a known issue with DashWare 1.9.1 caused by source videos without an audio track which prevents a useful export of the final output. DJI drones cannot record sounds without an external sensor set for this purpose. This can be relatively easily resolved by adding an audio track to the video. We used DaVinci Resolve to add a free audio file to our video footage. 

  3. File Format

    Overlaying telemetry data from an UAV onto a video can be done by using a CSV file. Acquire the CSV file by exporting the data from the UAV's flight controller or other telemetry source. 

    Edit the CSV to match the start of the video footage by checking its properties. Open the CSV file using spreadsheet software and navigate to the column labelled 'is Video.' Select all the rows before the value 1 that is 0 in the 'is Video' column, and delete those rows.

Screengrab of a CSV file with 'isVideo' column highlighted.

(B) DASHWARE PROJECT: 

Launch DashWare from the start menu or desktop shortcut.

  1. Click the ‘File’ button in the top left corner of the main window.

  2. Select ‘New Project’ and enter a name for your project in the ‘Project Name’ field.

  3. In the same dialog box select ‘<None>’

  4. Click on ‘Ok’ to save these changes.

  5. DashWare will open the new project and display the main window.

  6. Click on the ‘+ (Plus)’ icon next to the ‘Video’ title in the tab. Browse and select the pre-processed video.04

  7. Click on the ‘+ (Plus)’ icon next to this title in the tab, to view the ‘Add Data File’ dialog box. Click on the ‘Browse’ button under the title ‘Data logger file’, locate and select the .csv file containing all of the data from the selected drone flight video.

  8. Click on the downward arrow under the title ‘Choose a data profile’ and select ‘Flytrex’. Click on the ‘Add’ button to confirm choices.

When one starts a new project in Dashware, the main window displays a blank video screen on the LHS with the Dashware logo and some gauges, while the RHS displays the primary workspace.

The ‘Project’ tab is the central location for managing and configuring any project. It includes several sub-tabs that allow access to different types of information and settings related to the project. 

  1. Click on the ‘+ (Plus)’ icon next to the ‘Video’ title in the tab. Browse and select the pre-processed video.04

  2. Click on the ‘+ (Plus)’ icon next to this title in the tab, to view the ‘Add Data File’ dialog box. Click on the ‘Browse’ button under the title ‘Data logger file’, locate and select the .csv file containing all of the data from the selected drone flight video.

  3. Click on the downward arrow under the title ‘Choose a data profile’ and select ‘Flytrex’. Click on the ‘Add’ button to confirm choices.

Add pre-processed .csv and .mp4 files using the data logger.

 (C) PROJECT GAUGES: 

In DashWare, project gauges are graphical elements that overlay data onto videos. They can display various types of information, such as GPS coordinates or telemetry data. The Gauge Toolbox is a feature that allows one to add, create, and customize these gauges in a project. It also provides tools and options to design and adjust the appearance of data overlays.

The 'Filter' selection in the Gauge Toolbox is useful for searching and narrowing down to a specific gauge. One can also start listing the required attributes, such as speed, altitude, distance from launch, sea level, etc.

Gauge Toolbox search for the keyword 'altitude'.

Using the Gauge Toolbox, select the relevant gauges that correspond to these attributes. Make sure that each gauge is set to the same metric system as the data in the CSV file, such as kilometers per hour for speed or meters for altitude.

After selecting the appropriate gauges, add them to the project by pressing the gauge button or by clicking and dragging them onto the video screen. The gauge can then be further adjusted by clicking and dragging it to the preferred location.Here's the revised version with grammar corrections:

Gauges can also be modified as needed, such as this compact DashWare gauge above that displays speed, sea level, altitude, vertical speed, heading, takeoff distance, and traveled distance. To learn more about modifying and creating gauges, read the following blog. Modified gauges for displaying telemetry on UAV footage can be downloaded from our satellite drone imagery workflow page.

(D) DATA SYNCHRONISATION: 

Play the video in the workspace to cross-check if the data is in sync with the video footage. In case, the gauge overlay is not in sync with the video footage, cross-check the following information:

  1. Check the unit system to the units in the flight log.

    The values do not automatically convert to the gauge selected. Therefore it is pertinent to choose gauges with the unit system as in the flight log.

  2. Check if the gauge has a data value mapped to it correspondingly. 

    (a) To do so, change tabs to ‘Project’ in the primary workspace in Dashware.

    (b) Locate the gauge in the ‘Project Gauges’ sub-tab and double click on the gauge name. 

    (c) An editable dialogue box title ‘Gauge Input Mapper’ will be displayed, with two input options. (i) Data File and (ii) Data Value.

    (d) Review both data fields for appropriate entry, in case of modification use the downward arrow to select appropriate value from the list. Click on the ‘OK’ button to save changes.

Gauge Input Mapper with input options: (i) Data File and (ii) Data Value.

To sync the footage with the CSV file, navigate to the ‘Synchronization’ tab.

  1. Uncheck the ‘Sync with video’ option in (b.) the bottom right-hand corner.

  2. Then, drag the pointer to the start (c.) of the synchronization map.

  3. Next, click and drag the video player to the start of the (a.) timeline at 0:00:000.

  4. Once this done, re-check the ‘Sync with video’ option in (b.)

To synchronize the footage with the CSV file, use the 'Synchronization' tab.

E. Export Project

For the final step of the project, once all attributes and data have been mapped, we can export the file.

  1. Click the 'File' button in the top left corner of the main window.

  2. Select 'Create Video' and use the 'Browse' button to choose the location for the final file.

  3. Uncheck 'Auto' near the Quality option in export to manually choose the quality of the export. Once decided, click on 'Create Video,' and the export will be ready shortly.

'Create Video' dialogue box.

In conclusion, DashWare has proven to be a valuable tool for integrating telemetry data with aerial footage in our conservation work. By allowing us to annotate videos with critical flight information, it enhances our ability to analyse and present data collected during drone missions. We hope this guide helps other conservationists and drone enthusiasts streamline their video processing workflows, making it easier to visualise and share the insights gathered from their aerial surveys.

*Note: This a tutorial for using dashware based on my experience on adapting footage from for DJI Mini/Mavic video footage.

Understanding Drone Orthomosaics

Orthomosaics are individual images stitched into one single high-resolution image. In our case, these are taken from the drone and so they are georeferenced and can give a resolution of upto a few cm per pixel. This is drastically finer than freely available satellite data and so drone based orthomosaics are being used extensively for all types of landscape assessment.

Collecting data for an orthomosaic:

To create a drone-based orthomosaic, one has to plan an appropriate flight mission. However, some important factors to keep in mind when planning a mapping mission are -

  • The flight needs to form a grid, with the drone moving at a constant height and gimble pitching straight down at 90 degrees. 

  • Maintain a minimum of 70% to 80% front and side overlap of images captured while planning the flight.

  • Collect Ground Control Points from the Area Of Interest to improve the accuracy of georeferencing of the orthomosaic.

  • Maintain a moderately slow speed for the drone to move between images so as to reduce distortion.

  • Use mechanical or global shutter, if available, to capture images from drone cameras.

More details of this can be found on our blog on creating mapping missions.

Processing drone data to create an orthomosaic:

Once the drone images are collected, they need to be stitched together to create this high-resolution, georeferenced orthomosaic. At TfW, we used WebODM for this purpose. 

WebODM is a user-friendly drone image processing software. It is a web interface of OpenDroneMap (ODM), which is an open source command line toolkit for processing drone images to create maps, point clouds, 3D models and other geospatial products. There are two versions of this software: WebODM and WebODM Lightning. 

The offline version of  WebODM can be installed manually for free using this link. Command line skills are required to install this version. The installer version of offline webODM is also available here for a one time purchase. The offline version uses the local machine for processing and storing data.

Note: The WebODM Lightning option is a cloud hosted version of WebODM with some additional functionalities. This version is subscription based with standard and business categories. The trial version comes with 150 credits of free usage. The free credits suffice to process 337 images. The number of tasks allowed in free trial is not clear from the documentation. Paid plans will be required to process more images.

Once you have the images from the mapping mission - you can import them into the web ODM by selecting the ‘Select Images and GCP’ option. 

Fig. 01: Select images and Edit options

While selecting the images, exclude the outliers. For instance, images of the horizon or randomly clicked images which may be errors and should not be included in the orthomosaic. 

After selecting the images, one can edit the settings of the processing workflow by clicking on the Edit option (Fig 01). The functionalities of all the customizable options available in ‘Edit’ are explained elaborately here.

Some default options are as listed in (Fig 02). The default options work for most cases and the best way to assess edit options is to run them on a test dataset. 

Fig. 02: Customised Edit Options

Pro Tip: The High Resolution option with the original image size option takes more than an hour to process 200 images. The fast orthophoto option is quicker but the orthomosaic will have some distortions as displayed here. The guidelines to optimize flight plans according to the landscape are listed here

Analyzing orthomosaics:

This orthomosaic can now be analysed as a .tif file in GIS softwares. In this section, we explore how to use QGIS for this purpose.

Install a stable QGIS version from Download QGIS. It is advisable to install the most stable updated version than the latest version. 

Import the tif into QGIS: Once you download all the assets from webODM task, navigate to the folder where you have saved the outputs. The users are encouraged to explore the downloaded folders to gain information on the flight plan logistics. Among the downloaded files and folders, you can navigate to the odm_orthophoto folder and import the odm_orthophoto.tif file into QGIS map view.

Fig. 03: Download the assets.

Creating indexed images from satellite and aerial image bands is an effective way to extract information from the images. A list of few insightful indices are listed in this blog. In this instance, we will use the Green Leaf Index to get a visual estimate of the greenness of the area.

To begin, once you have imported the tif file into QGIS, select the ‘Raster Calculator’ from the Raster menu.

Fig. 04: Select raster calculator option.

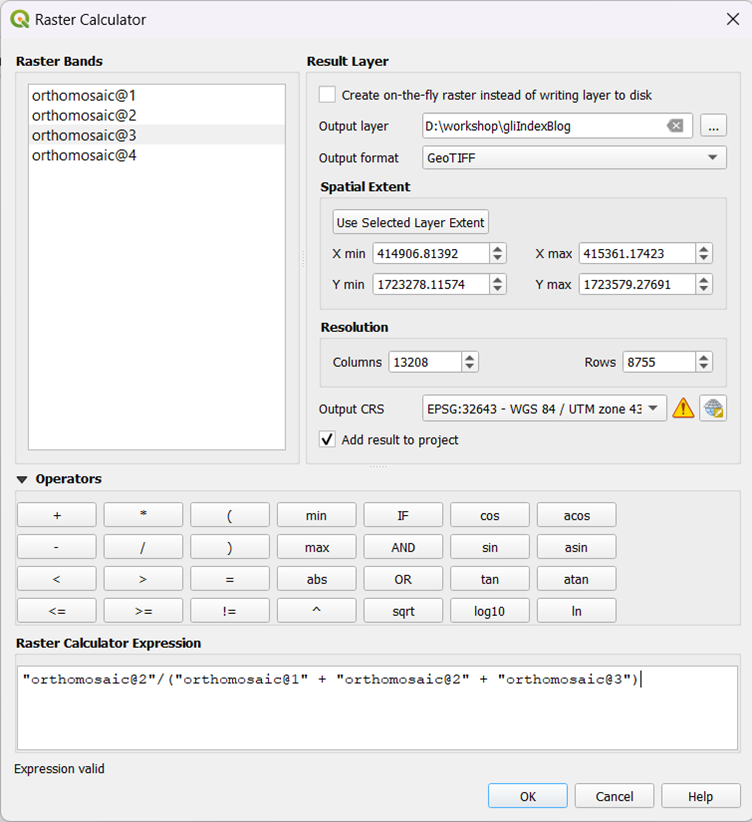
Select the bands and calculate the Green Leaf Index using the raster calculator:

Green/ (Green + Red + Blue)

Fig. 05: Raster Calculator. 

Once you have the indexed output, select appropriate symbology to view the indexed image. Right click on the layer and select ‘Properties’ or double click on the image. Navigate to Symbology option. 

Fig. 06: Symbology of layer.

Select the appropriate settings for colour ramp and apply it to the indexed image. 

Fig. 07: Image with selected symbology.

We see that the above image is not giving us a contrast in the image to estimate vegetation health. In this case, one can explore the blending option. This may be useful to get an immediate idea of the area at a glance.

Fig. 08: Blending options for better visual assessment.

In order to extract contrasting information from the orthomosaic and indexed image, we can check the histogram of the indexed image and then decide the minimum and maximum values based on the distribution of the image.

Fig. 09: Histogram analysis for optimising visual output.

Looking at the histogram we can tell that the range of information is encoded between 0.3 to 0.6 pixel value range. Now go back to the symbology and change the minimum and maximum values to that range. 

Fig. 10: Image after rectifying minimum and maximum value range.

From the indexed image, we see that the western part of the image has lower leaf area as compared to the other parts. In order to focus on that area, create a polygon over it and draw a grid.

Fig. 11: Create a polygon layer.

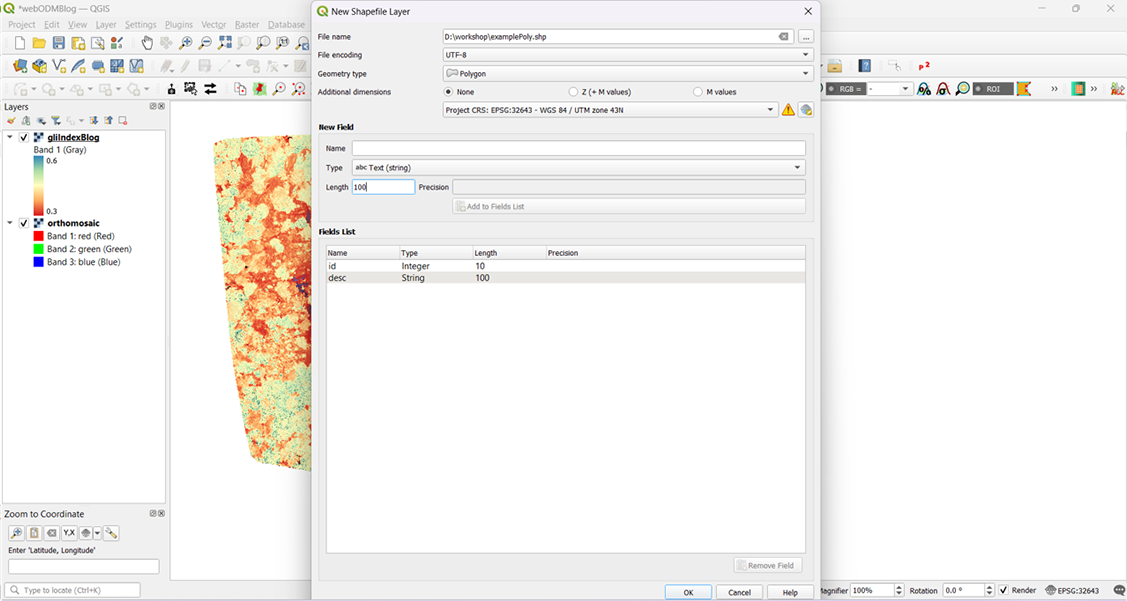
Fig. 12: Select options to create a polygon.

You must digitise a polygon in projected CRS. Projected CRS is necessary for making measurements on the shapefile.

Fig. 13: Digitise and save the polygon.

To calculate the area of the polygon, right click the polygon layer and open the attribute layer.

Fig. 14: Open attribute table.

Open the field calculator and select the option shown in the following image to calculate the area of the polygon.

Fig. 15: Select ‘area’ field from Geometry.

Fig. 16: Area field added to the polygon.

The area field is automatically calculated and added to the attribute table. It is recommended that the polygon layer has a projected CRS for this calculation to be correct. Then save edits and untoggle the editing.

You can also create a grid of squares in the polygon using the create grid tool under the vector menu.

Fig 17: Creating a grid.

You can select the Rectangle type of grid, but there are other options like points, lines etc which can be chosen depending on the objective. Make sure to select the layer extent of the example polygon.

The above parameters should create a grid of rectangles of specified dimension.

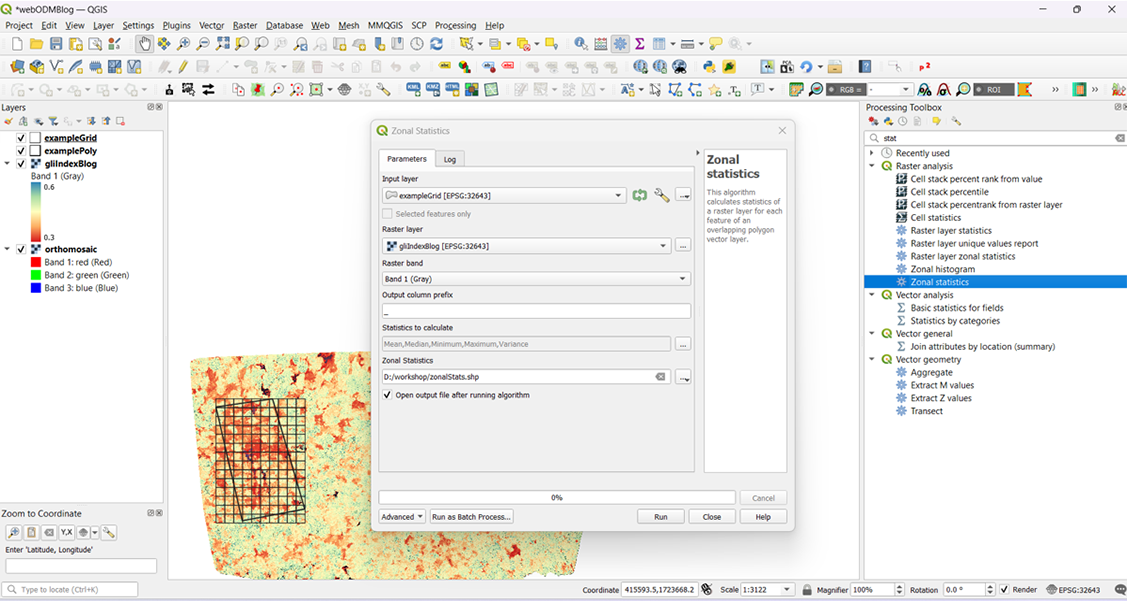
Fig. 18: Zonal statistics from Processing toolbox.

The zonal statistics can be selected from the ‘Processing toolbox’. One can select which statistics are to be calculated and a new polygon of zonal statistics will be created. 

Fig. 19: Select the statistics to be calculated.

Now one can choose the statistic which they want to display and select an appropriate symbology to assess the least to most leaf cover in the selected example area as shown in the figure below.

Fig. 20: Visualise the statistical output.