Unmanned Aerial Vehicles (UAVs) can create orthomosaics to better understand ecosystems. To plan the flight path of a UAV for orthomosaic creation, we’ve developed a plugin compatible with QGIS
UAV Mapping Path Generator (for Litchi)
Our UAV Mapping Path Generator plugin takes into account camera parameters, altitude, overlaps, and more to prepare an optimized flight plan. This flight plan is compatible with the FlyLitchi app, which operates flights for DJI drones.
The steps below describe the installation process, logic and method to use the plugin. To install the plugin:
Go to Plugins > Manage and Install Plugins.
Search for UAV Mapping Path Generator (for Litchi) and install it.

Fig. 01a: Install the plugin.

Fig. 01b: Install the plugin.
The plugin will be available for use from the ‘Vector’ menu.

Fig. 02: UAV Path Generator Plugin.
SETTING UP THE PLUGIN
Some default drone camera specifications are pre-filled in the plugin. However, you can adjust these settings by accessing the drone specifications for your specific model here.
Mandatory Inputs for the Plugin:
Altitude
Field of View (FoV)
Side Overlap %
Front Overlap %
Aspect Ratio
Image Height & Width
Speed
Gimbal Pitch Angle
These drone camera parameters are readily available in the drone specifications. The overlap percentages you choose will influence both the area covered and the time taken for the drone to complete the flight. The plugin calculates and displays the approximate flight time at the end of its execution (see Fig. 05).
Note: The flight time shown in FLyLitchi is slightly longer than that calculated here.
The parameters and the input types are as described below.
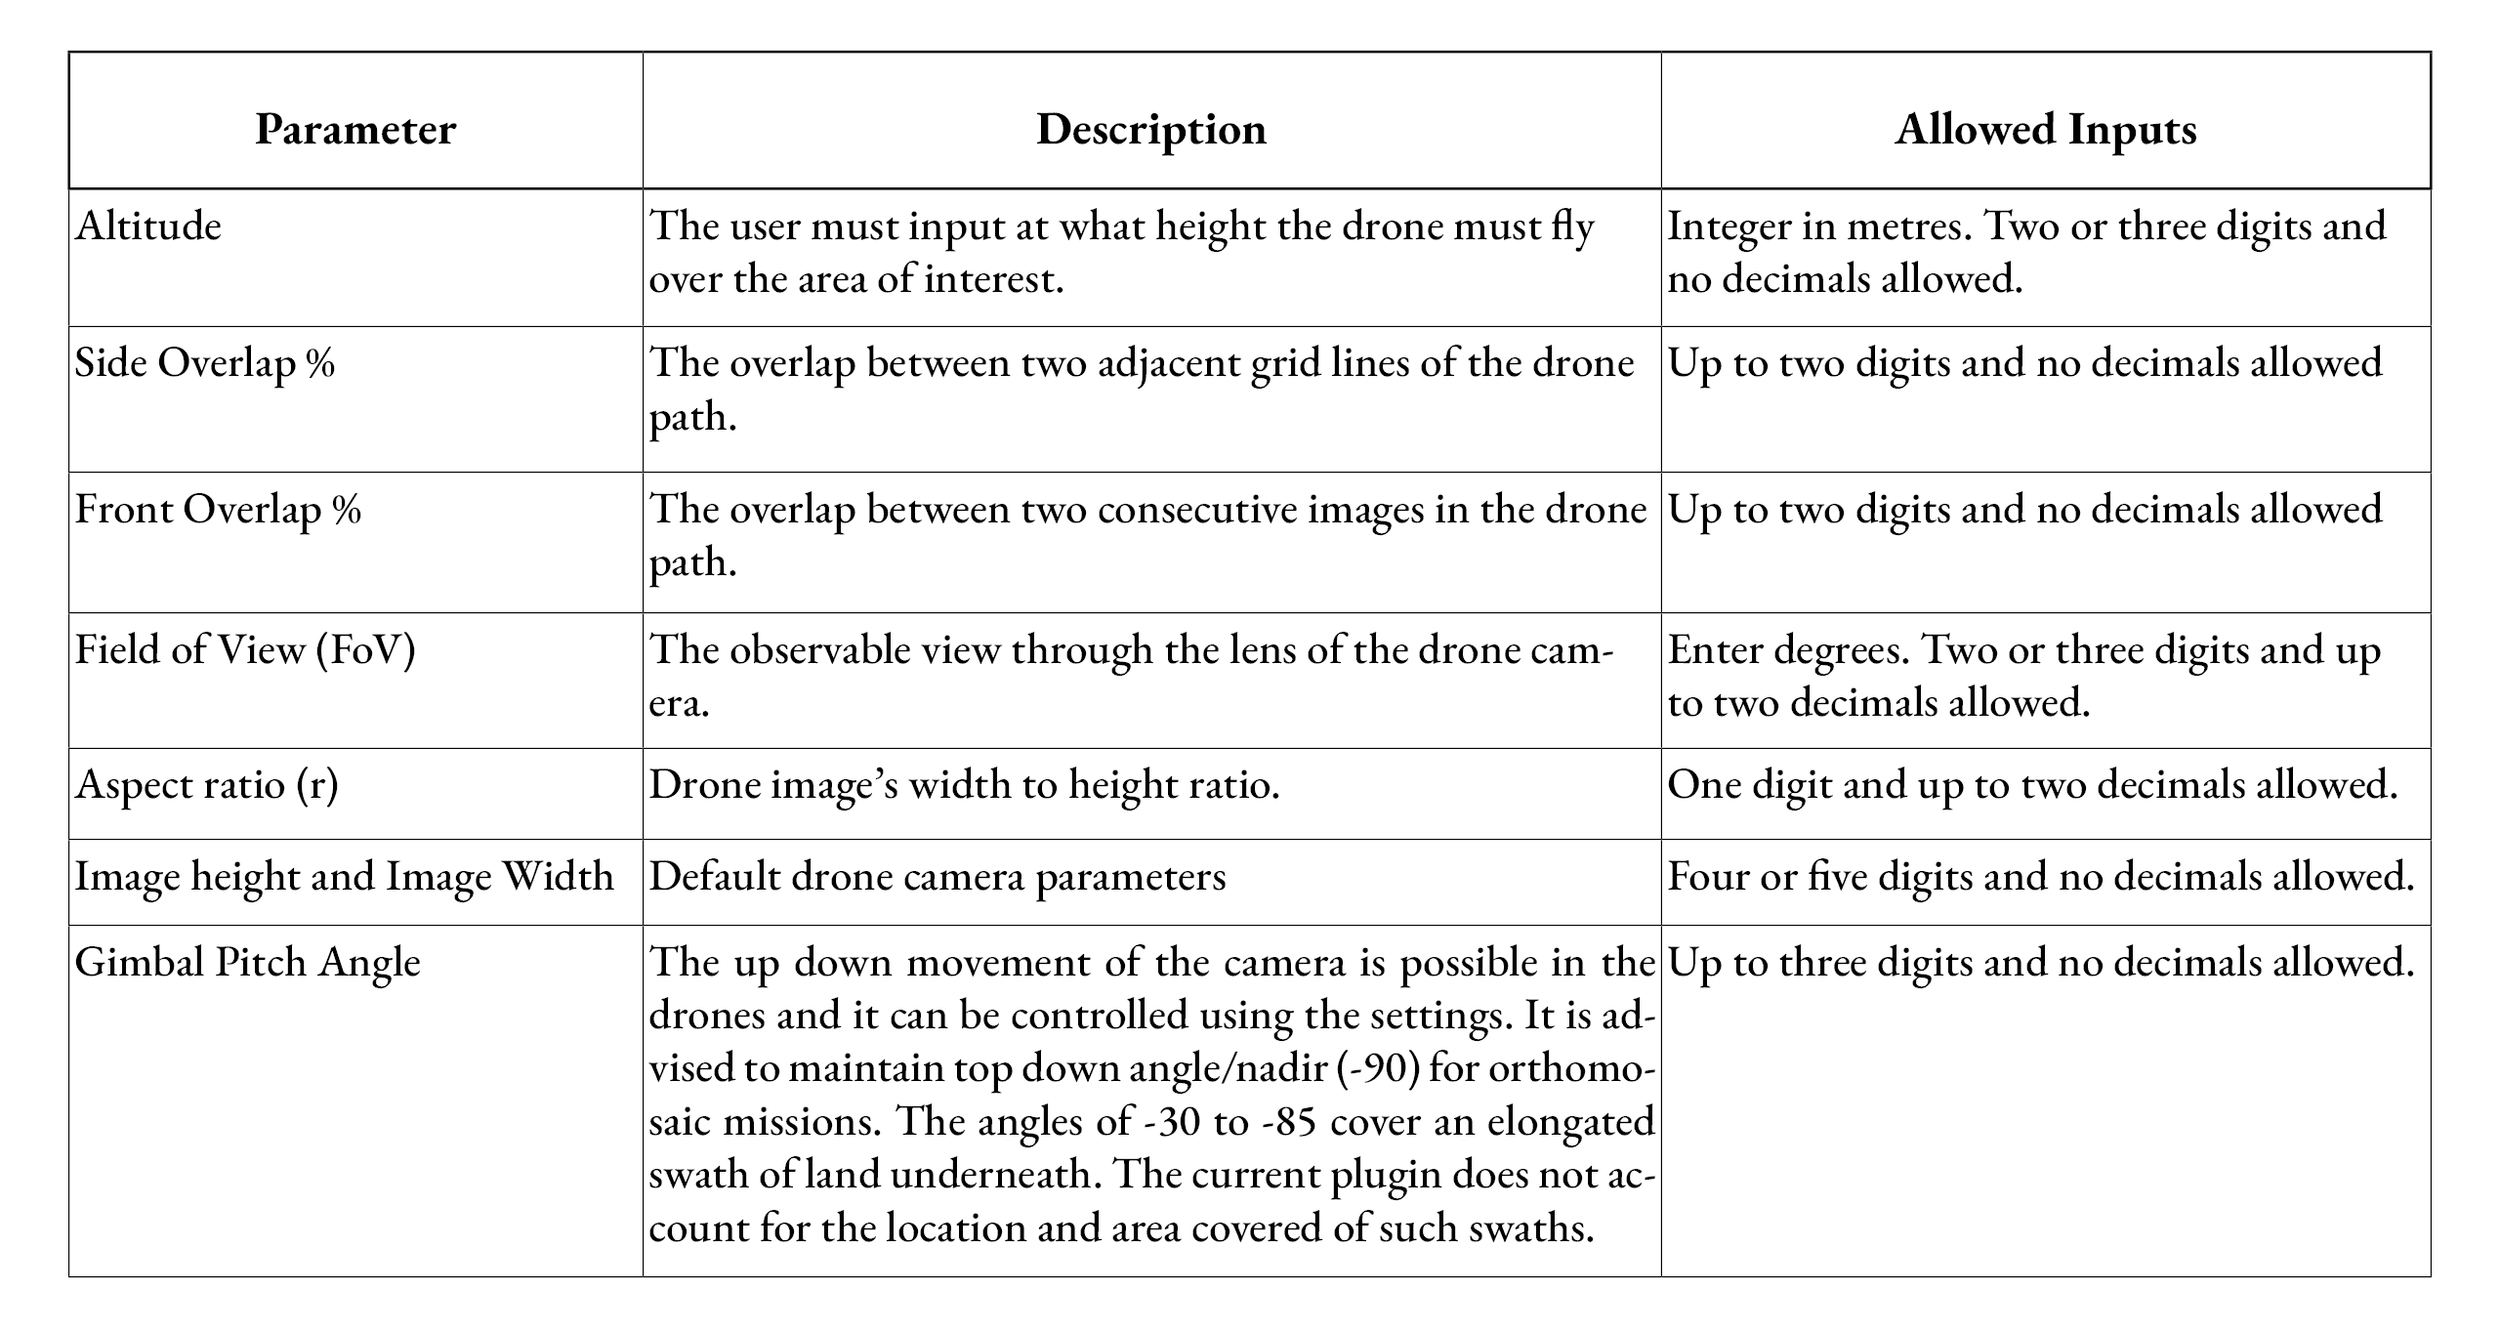
Fig. 03

Fig. 04: Calculated parameters and formulae.
How to use the PlugIn:
Then the user has to upload a shapefile of the area of interest. This shapefile should be of polygon geometry type only and in EPSG:4326 GCS projection. The users are advised to select a polygon and fill this input in every execution and make sure to click on the ‘Load’ option after filling the input. Following the selection of AOI, the user must draw a line - ‘Input_line.shp’:
Notes on the line:
This line must be outside the AOI polygon.
It should be in a direction parallel to the desired drone path.
The drone path will be drawn to the right/above this line.
This line is plotted in EPSG:4326 GCS projection.
As soon as you click on the ‘Draw Line’ option, the toggle editing is enabled and the user will be prompted to draw a line in the required direction. To end this action, save the edit, untoggle the edit mode and then the plugin dialog box will pop back in the map interface and the draw line box will be populated.
Then the user should input an approximate number of parallel lines to the input line that would cover the entire area of interest. When the user clicks on the ‘Draw Flight Path’ option, the parallel lines are drawn and clipped to the area of interest and then the way points are created according to the overlap percentages as shown in Fig. 06.
The flight time is also calculated as soon as one clicks on the ‘Draw Flight Path’ is clicked. The Fig. 05 shows that the flight will take 60 minutes to finish the entire flight. Hence, the user must split the area to be covered in each flight as one drone battery gives 20 mins of effective flight time.
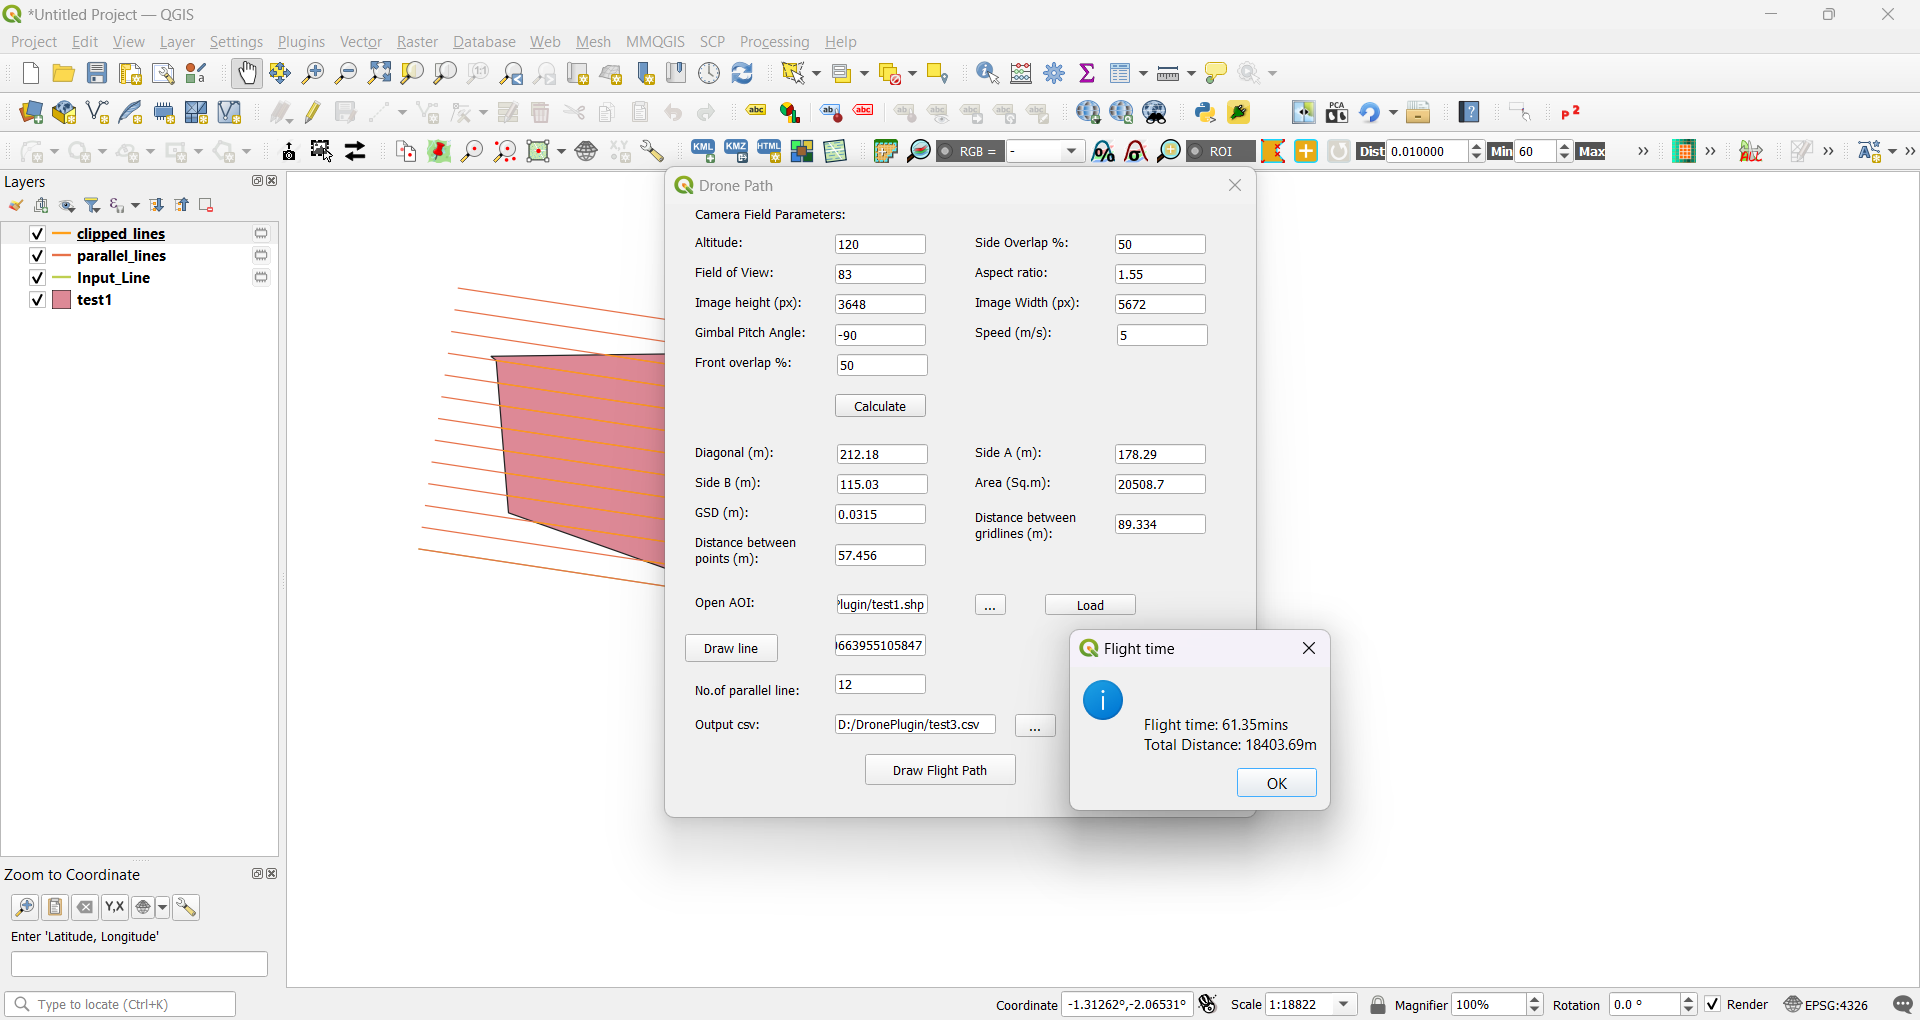
Fig. 05: Flight time calculated.
Example of input line and the drone path:
(a) Input horizontal line, (b) Drone path with horizontal input line at the bottom,
(c) Input vertical line; (d) Drone path with vertical input line on the left.

Fig. 06: Input for a drone-path.

Fig. 07: The flight path in FMH.
A Fly Litchi compatible csv file is then created and it can be opened in Fly Litchi Mission hub. Make sure the waypoints in the csv file show on the map view.
From this point, one can use the FlyLitchi App to check settings and execute the mapping mission. For more instructions on using the fly litchi app, please refer to our other blog on planning photo and video missions for UAVs.
Below is a visual walk-through of using the above plugin.